Yup, yet another post on my programming videogame: Dobadobots.
Today, we are going to dig into the editor’s implementation.
Motivations
I wanted the game to be as enjoyable as possible, I wanted a quick write/feedback loop. Using an external editor would have killed this fast feedback loop, it was just not an option.
I first thought about integrating a pre-existing editor in it.
An option would have been to create a web-view and embedding an HTML5 based text editor. After writing a quick proof of concept, I ran into some problems: I did not find any lightweight way to make the editor communicate with the core Haskell application. The only solution I found would have been to make this happen by running a WebSocket server. This solution seemed totally overkill, I decided to dismiss it.
Another option would have been to find a library implementing the basic features of an editor. However, I have not been able to find any Haskell/SDL2 text editor. Perhaps this tech stack is a bit too much specific! :)
So, being unable to find anything meeting my requirements, I ended up writing my own editor.
The Editor’s Architecture
As usual I started by specifying the data types and, as usual, we encapsulate the editor state in a proper record structure.
data EditorState = EditorState {
  text               :: Text,
  cursorColumn       :: Int,
  cursorLine         :: Int
} deriving (Eq, Show)
It encapsulates two things:
- The position of the cursor.
- the text contained in the editor’s buffer.
In addition to this state, we also need to generate some SDL textures we will use to display both the text and the various editor elements. I ended embedding these elements to the renderer state which already contains most of the game textures.
data RendererState = RendererState {
  (...)
  editorCursor       :: (SDL.Texture, SDL.V2 CInt),
  codeTextures       :: [(SDL.Texture, SDL.V2 CInt)],
  parseErrorMess     :: [(SDL.Texture, SDL.V2 CInt)],
  parseErrorCursor   :: (SDL.Texture, SDL.V2 CInt),
  editor             :: EditorState,
}
We can see the code is stored in multiples textures: one per code line.
Text Display and Typefont Generator
We need to display the text on the screen. The code text is basically some UTF-8 characters separated by spaces and newlines.
In order to display some text using SDL2, you first need to create an OpenGL texture representing this text. To do that, you want to use a typefont generator. It is basically a program which generates an OpenGL texture according to a TTF font and a UTF-8 input text. In this project, I used the SDL2-TTF library.
This typefont generator is distributed as a C library.
Some Haskell bindings were already available, hence, I did not even need to write the corresponding FFI files. The tricky part for using this library was to use it in the continuous integration runner.
I use Travis as a CI, which sadly uses an outdated ubuntu. This ubuntu does not provide any kind of pre-compiled SDL2-TTF binary, you need it to build it by yourself.
You will need libgl1-mesa-dev to build it. Because of Travis’s exoteric path configuration, you will also need to add the /usr/local/lib directory to the LD_LIBRARY_PATH environment variable.
Here’s the corresponding .travis.yml configuration section.
before_install:
- sudo apt-get install -y libgl1-mesa-dev
- wget http://libsdl.org/release/SDL2-2.0.5.tar.gz -O - | tar xz
- cd SDL2-2.0.5 && ./configure && make -j && sudo make install && cd ..
- wget https://www.libsdl.org/projects/SDL_ttf/release/SDL2_ttf-2.0.14.tar.gz -O - | tar xz
- cd SDL2_ttf-2.0.14 && ./configure && make -j && sudo make install && cd ..
- export LD_LIBRARY_PATH=$LD_LIBRARY_PATH:/usr/local/lib/
Rendering the Editor
The renderer is in charge of both input events handling and graphics drawing.
We need to be compatible with both Unixes and Windows systems. SDL2 has been used as a hardware abstraction layer here.
The renderer is directly plugged into the main graphic event loop which looks like this:
- Check any kind of input.
- Potentially append the event to the editor state.
- Check the syntax of the code generated by the new event.
- If the syntax is valid, load the new AST in the game engine.
- Generate the new text textures.
- Draw everything on the screen.
For more details about this implementation, you can check the implementation itself.
Syntax Error Checking
To keep the test/evaluation feedback loop short, we include a syntax checker directly in the editor.
Thanks to the parser (see the previous post), this task was quite straightforward.
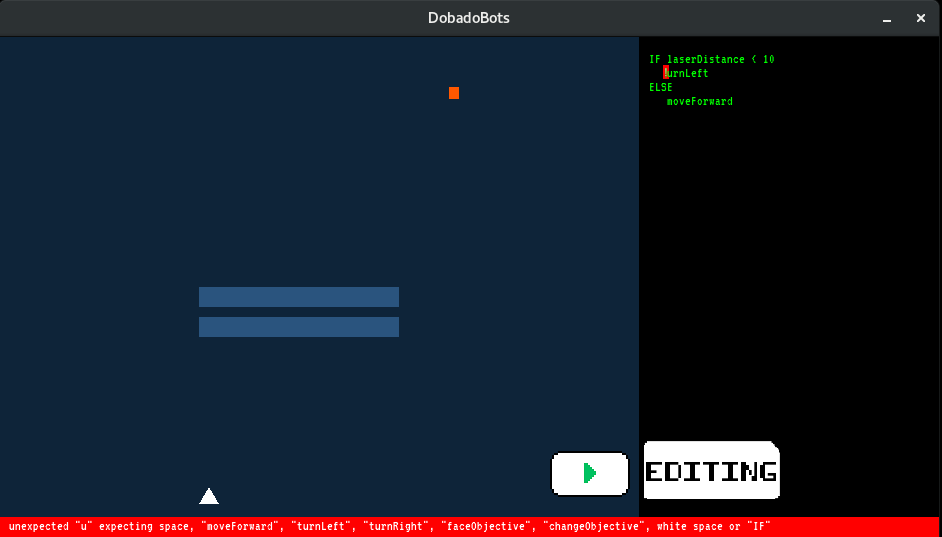
Parsec not only returns a short text describing the error and the potential fix but also returns a position (a column line couple) helping to localize the error. Using this localization, you can highlight this part while adding an error message at the bottom of the editor.

As you can see on the above screenshot, we display a red square next to the error. We then render the error message (if any) in a proper OpenGL texture and display it at the bottom of the screen.
Aaaaaand, that’s pretty much it. I omitted most of the algorithm describing the editor’s behavior, but trust me, there are many. I will probably write another article focusing on this part in the future.
That was the first time I was writing a text editor from scratch. I can now confirm that this is not, even remotely, a trivial task.
If you face someday the same problem, let me share with you this advice: find a freaking way to integrate an already existing editor to your program, do not write your own one!