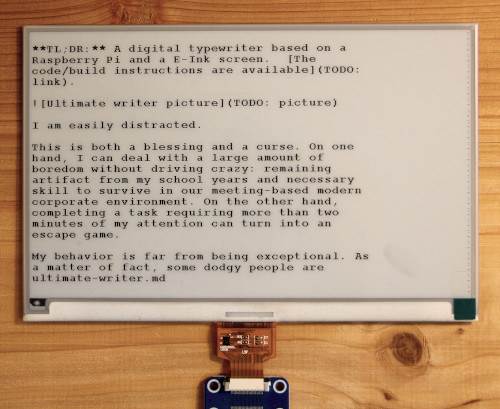
TL;DR: A digital typewriter based on a Raspberry Pi and an E-Ink screen. The code/build instructions are available on GitHub.
I am easily distracted.
This is both a blessing and a curse. On one hand, I can deal with a large amount of boredom without driving crazy: remaining artifact from my school years and necessary skill to survive in our meeting-based modern corporate environment. On the other hand, completing a task requiring more than two minutes of my attention can turn into an escape game.
My behavior is far from being exceptional. As a matter of fact, some dodgy people are making entire careers selling people like me books with clickbaity titles.
Overcome your Procrastination and Setup your own Ponzi Scheme in 30 Days.
The definitive guide.
- picnoir 2018
More seriously, I am a firm believer that restriction fuels creativity. I don’t think it’s the result of a transcendental zen achievement, this is more about restricting the possible creative outcomes. The less you have to explore what you can create, the more headspace you have to actually create things.
This is why I love my typewriter. You can write stories without having to wait for your computer to boot, you cannot be distracted by some kind of notification or the urge to check your favorite online place every half an hour.
However, using a typewriter comes with two major shortcomings:
- You cannot delete a typo. I know you do a lot of those, no need to expose this nasty behaviour to everybody’s face.
- You cannot share the text you wrote online, be it on your website or on any other social platform.
I came to think, maybe we should create a digital typewriter giving us the best of the two worlds.
Digital typewriters are not a new idea. In fact, one of them has even been commercialized: the Freewrite. To be honest, this project has been a major inspiration for the ultimate writer. It looks cool, has a mechanical keyboard and an e-ink screen. Sadly, their firmware is completely closed (ie. no way to use vim on it), and the price tag is pretty steep, to say the least.
After a quick search on the internet, I was unable to find an open hardware equivalent. I decided to create one: the ultimate writer.
The First Prototype
This project was built upon the following principles:
- Easily readable e-ink screen. You can read it effortlessly even in sunlight.
- Long lasting battery life. You can have a 3 days off the grid writing retreat (~20 hours) without having to recharge it.
- Easily serviceable design. Your typewriter is 40 years old and works just fine. You don’t want to change your writing device every 5 years. You want to be able to easily change the computer parts easily; and who knows, use something else than a raspberry pi.
- Standard OS. You want to use your favorite console-based text editor. You also want a shell access to tweak your setup without reprogramming the device.
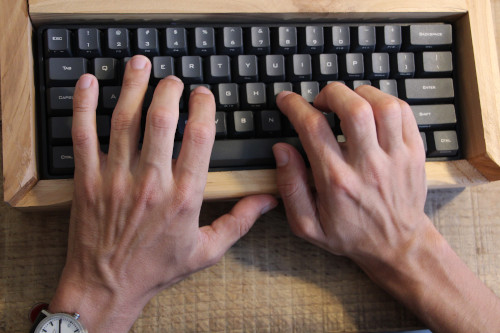
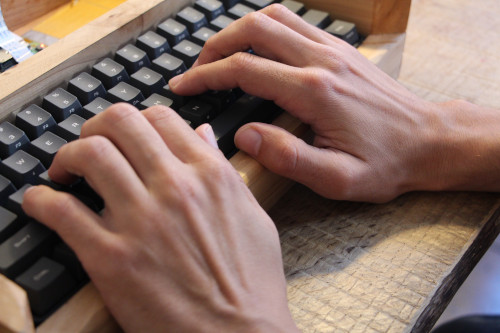
- Nice full-size mechanical keyboard.
The first prototype covers most of these features.
Overall, it looks like this.
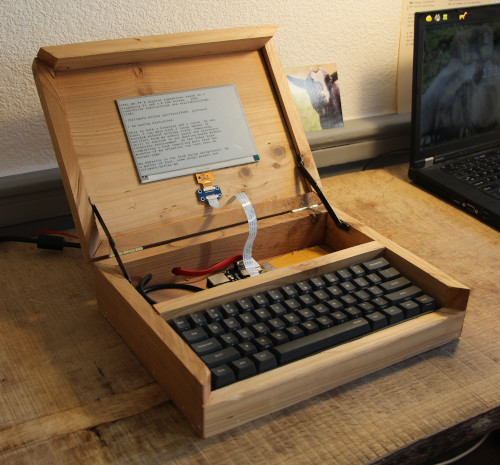
It cost me around 150€ (~180$) to build.
The mechanical keyboard is a 61 keys Chinese bootleg. It feels pretty good despite its really low price.
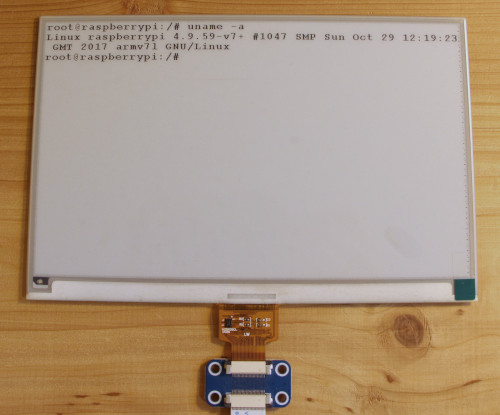
The E-Ink screen is coming from good-display. They don’t seem to sell them directly, but you can buy them from waveshare, a Shenzhen-based middle-man.
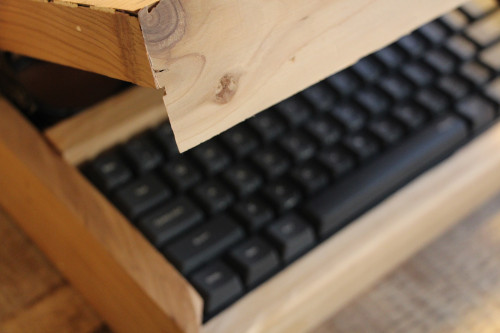
The case has been made from a locally grown cypress. I did not use any varnish, this awesome pink-ish color is the natural one. I love this wood <3.

The computer is running a standard Raspbian, I mostly use neovim to edit text.
The battery life turned out to be more around 16 hours. However, the Raspberry Pi 3B is not known for being energy-savvy. I guess we could easily reach the 20 hours autonomy by using a smaller computer.
Build Log
Nerdy stuff ahead. If you’re not interested in the technical details, you can directly jump to the what’s next section.
I started the whole prototype build with an assertion in mind: I need to reach a usable state for this project as quick as possible. I actually abandoned this very same project halfway through twice in the past.
In other terms, when I encountered a roadblock - and there have been many - I privileged the quick workaround to the labor expensive clean solution.
E-Ink Screen
First of all, we need to find a suitable E-Ink screen. Despite being old, this technology is still a niche. Finding a manufacturer able to create large (> 4") screens turned out to be tricky.
Spare E-Readers screens are the best lead: they are crazy cheap, decently sized and widely available. However, there is no off the shelf solution to drive them.
We desperately need an open source driver for those screens, I considered creating one. But as mentioned earlier: I want to build a usable prototype as quickly as possible, I don’t wanna be side-tracked.
Being unable to use a spare e-reader screen, I went the other way around and started looking for a manufacturer selling a screen which is directly usable by a stock Raspberry PI.
In the end, only one screen manufacturer seemed to be delivering that kind of screen: good display. These screens - like a lot of Chinese products - are rebranded all over the internet. Sometimes, they are re-branded and have half their datasheet butchered in the process - yes, I am looking at you Waveshare.
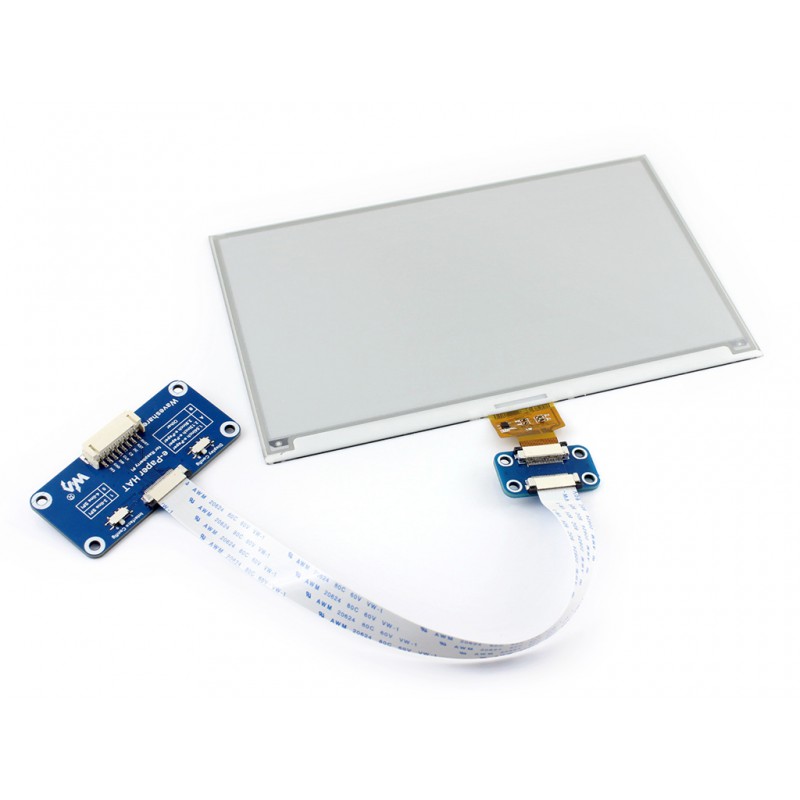
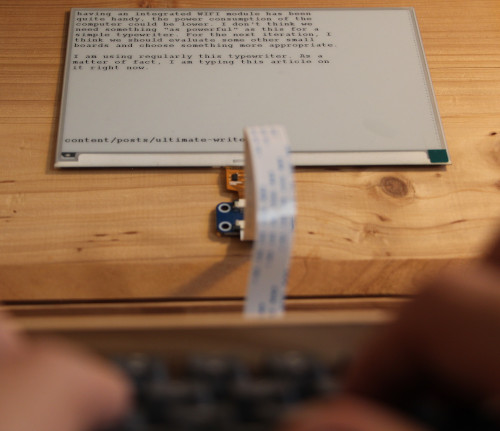
These screens are coming in three parts:
- A Raspberry Pi hat.
- A small IC connecting the hat to the screen.
- The screen by itself.
Despite how it looks, both of the blue CIs are breakout boards. The driver is embedded in the screen and is controlled by a standard SPI interface.
These screens are easy to use. Sadly, they have very a slow refresh rate: it takes around 3 seconds to perform a redraw. Needless to say, it’s way too slow to display any kind of interactive program.
These screens are driven using electromagnetic waveforms, Ben Kraznow from the Applied Science youtube channel made a fantastic video about this. You really should check it out, at least the first half.
Very quick and incomplete summary: in order to refresh the screen, you apply a specific waveform to each pixel depending on its previous and future state.
What’s great about good display screens is that you have a direct access to the registers specifying these waveforms. You can entirely reprogram the way the screen is driven.
Ben Kraznow found a way to implement a faster partial refresh which let you refresh the screen in about 0.3 seconds, which is more than enough for a text editing device. He implemented this for the 4.3" screen, I sadly haven’t been able to implement the same kind of fast refresh for the 7.5" screen.
Note: I’m going to dive in the nasty implementations details here and explain why we can’t have a fast refresh on the 7.5" screen for now. You may want to jump to the next section if you’re not interested.
Under the hood, these waveforms are specified using several look-up tables
(LUTs). You have 4 of them: black->black, white->white, black->white and
white->black. These LUTs are specific to each screen design.
You have two ways to specify these LUTs to the screen controller (take care, waveshare data sheets are incomplete, use the good display ones previously linked instead).
You can either:
- Use the pre-loaded LUTs in the IL0371 read-only flash.
- Use the LUTs stored in the IL0371 register which can be accessed using the SPI interface.
Good display stock firmware uses the second method to specify the LUTs for the smaller screens (< 7.5"). This is kind of useful when it comes to write a partial refresh mode because it means the LUTs are specified directly in raspberry pi library source code. We just have to extract them from there.
Ben Kraznow basically took these full refresh LUTs and removed all the intermediate drawing steps to only keep the last one. This solution works pretty great, you just still need to perform a full refresh periodically to correctly re-magnetize the burned greyish pixels.
I was first planning to do the same thing for the 7.5" display. Sadly, for some reason, good display is pre-loading the LUTs in the read-only flash for this model. We can’t extract the full refresh LUT from the driver firmware.
This leaves us with two solutions:
- We manage to dump the internal screen flash memory. This should be doable using the ROTP command. Sadly, I haven’t been able to read anything from my screen. I cannot tell if the problems come from a failure from my specific hardware setup or if somebody in the supply chain (waveshare? good display?) has been somehow disabling the MISO channel.
- We ask a manufacturer for the LUTs. I have been in contact with good display engineers, but they have been unable to give me access to either the LUTs or the data flashed in the IL0371.
I tried both of these solutions, neither worked. This has been the main roadblock for this project. So far, I just use the “slow refresh” and deal with the .3Hz refresh rate.
But I’m not gonna lie, while it’s enough to write text, it’s not remotely fast enough to edit the same text. Using vim interactively is not as nice as on my laptop’s 60Hz LCD screen.
Terminal Emulation
Alright, we can draw some pixels on the screen, let’s display something more useful: a terminal.
Have you ever taken a deep dive in terminal emulation? Did you manage to keep your sanity during the process? Fun fact: I did not.
Terminal emulation is a pile of legacy layers stacked during the last 40 years. Despite knowing that, if you’re still interested by the details, Linus Åkesson - yes, the very same guy who created the Chipophone, what a small world! - wrote a pretty good article on this matter.
Writing a full terminal emulator is actually a lot of work! So instead of starting a new one from scratch, I decided to adapt an already existing one.
When thinking about terminal emulators, XTerm comes first in mind. I started to dig in its code to be sure the adaptation wouldn’t turn into an unpleasant experience.
Oh boy, if you ever wondered how painful can legacy code be, please, check out XTerm: it is a masterpiece in its own kind.
Actually, I could have been smart and read the readme file instead:
Abandon All Hope, Ye Who Enter Here


This is undoubtedly the most ugly program in the distribution.  It was one of
the first "serious" programs ported, and still has a lot of historical baggage.
Ideally, there would be a general tty widget and then vt102 and tek4014
subwidgets so that they could be used in other programs.  We are trying to
clean things up as we go, but there is still a lot of work to do.

If you are porting this to a machine that has problems with overlapping
bcopy's, watch out!

There are two documents on xterm: the man page, xterm.man, which describes
how to use it, and ctlseqs.ms, which describes the control sequences it
understands.
What do we learn here? Always read the README file first.
Anyways, after looking a bit for something else, I found out the Suckless team created a terminal emulator: ST. I decided to use it.
I started by chopping out the XOrg related features, I did not want an unnecessary dependency on X libs. After chopping everything out, I started to replace these calls with the E-Ink drawing primitives.
The e-ink screen stock library was written in C++: it needed a full C rewrite to function properly along with the ST codebase. I found and fixed several bugs in the process, most of them were due to poor error handling.
Input Processing
Keyboard inputs, how do we capture them? Well, there’s no immediate answer to that.
See, we don’t have any graphic stack redirecting the keyboard inputs to stdin. The keyboard events are handled by linux’s /dev/inputX virtual devices. You may think “well, just pipe this file in and you’re good”. Well, no. This file is using a custom event-based binary format. In it, you’ll find the various key press, key releases, and other events, but you’ll need to process them accordingly to a global state - is shift pressed? Is ctrl pressed? - and translate these events to their characters and pipe everything to stdin.
The best solution I ended with was to use a keylogger and tail -f the file to
the application stdin. It could be certainly better, but it is good enough for
now.
Not really tricky but worth mentioning: there isn’t any arrow key nor ctrl ASCII value. These are actually translated to VT100 special sequences. Keep in mind you need to translate these specials keys to their associated sequence.
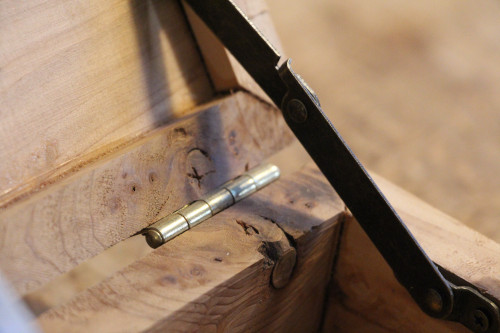
The Case
Gotta admit I have been lucky here. I’ve been offered some locally-grown dry cypress to build it. Thanks dad! This wood is amazing: it looks nice, it’s crazily light and really tender. Working with it has been such a pleasure!
Having access to a whole woodworking workshop also made that build really easy!
I wanted to use dovetail joints to seal the case. Sadly, I ran out of time and had one day to complete both the design and the build of the casing; way too little time to perform 8 dovetail joints.
We used a miter saw to cut the 45° joints. I usually use a good old handsaw for this kind of work, needless to say, the miter saw is a total game changer!
I found the hinges in my local hardware store. The compas were more tricky to find due to their small size; I managed to find mines on eBay.
The case could clearly be better. But for a first iteration, it’s more than ok.
We could do better on an ergonomics standpoint though. Maybe by adding a foldable wrist rest? As it is, the keyboard is a bit too high and tends to put some tension on your wrists making typing a bit uncomfortable on the long run.
Anyways, overall, I am satisfied with this design.
What’s Next?
I used a Raspeberry Pi 3B for this prototype mostly because I already owned one. While having an integrated WIFI module has been quite handy, the power consumption of the computer could be lower. I don’t think we need something “as powerful” as this for a simple typewriter. For the next iteration, I think we should evaluate some other small boards and choose something more appropriate.
I am using regularly this typewriter. As a matter of fact, I am typing this article on it right now.
However, I find the current screen refresh rate way too low. Don’t get me wrong, it is usable, but I feel like the latency makes the whole experience not as pleasant as it could be.
My middle-term objective regarding this project is to produce a small batch of those with a more compact wooden case and sell them. Sadly, because of the low screen refresh rate, I don’t think we’re at this point yet.
I need your help to finish this project. How could you help me? Well, several ways to do this:
- Are you one of these hardware geniuses? Do you think you might be able to create a board that can drive a spare kindle screen at a >2Hz rate? Would you be ok to put your design under an open hardware license? Please get in touch with me and let’s finish this open hardware/FOSS digital typewriter together! You can find my contact details on the about page.
- Do you know such a person? Please, forward them this article :)
Otherwise, you still can boost this fediverse post or this tweet to help me reach this kind of people.
Special thanks to Malix for the nice pictures! <3